
#64 Как обеспечить безопасность домашней сети с помощью мини-компьютера Raspberry Pi 3 * How to keep your home network secure with a Raspberry Pi 3 mini computer


Компьютерная безопасность с расширением функционала сети Интернет в обеспечении комфортных условий жизнедеятельности становится важной областью знаний для каждого пользователя сетевых устройств. Среда жизни человека становится все более компьютеризирована: управление жилищем, автомобилем, системами охраны, как личной так и имущества, системы навигации, системы жизнеобеспечения взаимосвязаны со Всемирной сетью и локальными сетями передачи данных. И потому знание основ информационной безопасности является важной компетенцией современного человека. В блоге "В мире ИТ: in the world of IT" читателю предложены разнообразные материалы по проблеме кибербезопасности. К примеру, большая публикация посвящена атаке на критический для жизнеобеспечения США объект - бензопровод Colonial Pipeline Company. Данный материал посвящен увлекательному способу сделать домашнюю сеть более безопасной. Кроме того, те, кто решится реализовать данный проект в своем доме, узнают много нового об использовании и настройке микрокомпьютеров, таких как Raspberry Pi. Полезного чтения!
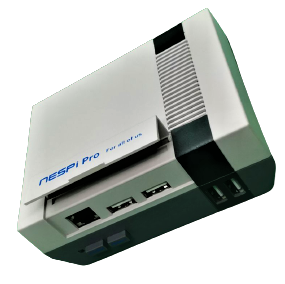 |
| Raspberry Pi 3 |
Основной рекомендацией, позволяющей предотвратить проникновение хакеров в настройки и информационные данные, является необходимость разделить домашнюю сеть на несколько частей, изолированных друг от друга. Оптимальный способ решения проблемы - использование миниатюрного компьютера Raspberry Pi.
В большинстве домов, подключенных к сети Интернет, топология домашней сети обычно типовая: все оборудование подключено непосредственно к Интернет-терминалу оператора и использует единственную локальную сеть. С распространением домашних терминалов к этой единой линии подключают самое разнообразное оборудование. Из одной и той же сети работает стационарный компьютер, на котором совершаются онлайн-покупки, накопитель NAS, на котором хранятся все семейные фотографии, ноутбуки детей, которые начинают зависать в одноранговых сетях с низким качеством сигнала и абсолютно уязвимыми; другие электронные сетевые устройства.
 |
| Как обеспечить безопасность домашней сети с помощью мини-компьютера Raspberry Pi 3 |
Сегментирование домашней сети для обеспечения её безопасности
Комбинировать таким образом оборудование в рамках одной сети специалистами по кибербезопасности не рекомендуется. Хакеру, которому удастся заразить один из подключенных объектов или один из ноутбуков, довольно легко получить доступ и к другому оборудованию. Вот почему специалисты по безопасности рекомендуют максимально сегментировать сеть. В одной части в таком случае необходимо разместить критически важное оборудование, которое должно быть абсолютно защищено (родительские компьютеры, NAS), а в другой мы можно разместить терминалы высокого риска, к которым можно отнести игровые ноутбуки или другие подключенные объекты.
 |
| Как обеспечить безопасность домашней сети с помощью мини-компьютера Raspberry Pi 3 |
Самый простой и логичный способ добиться этого - подключить два маршрутизатора Wi-Fi к Ethernet-роутеру. В таком случае соответствующие сети будут изолированы друг от друга. С другой стороны, в этом случае невозможно использовать сеть Wi-Fi роутера, поскольку она не будет изолирована от двух других. Подводные камни этого решения заключается в том, что здесь сеть выстраивается через Ethernet-роутер и пользователю необходимо приобрести два новых Wi-Fi маршрутизатора. Это обременительное решение для домохозяйства.
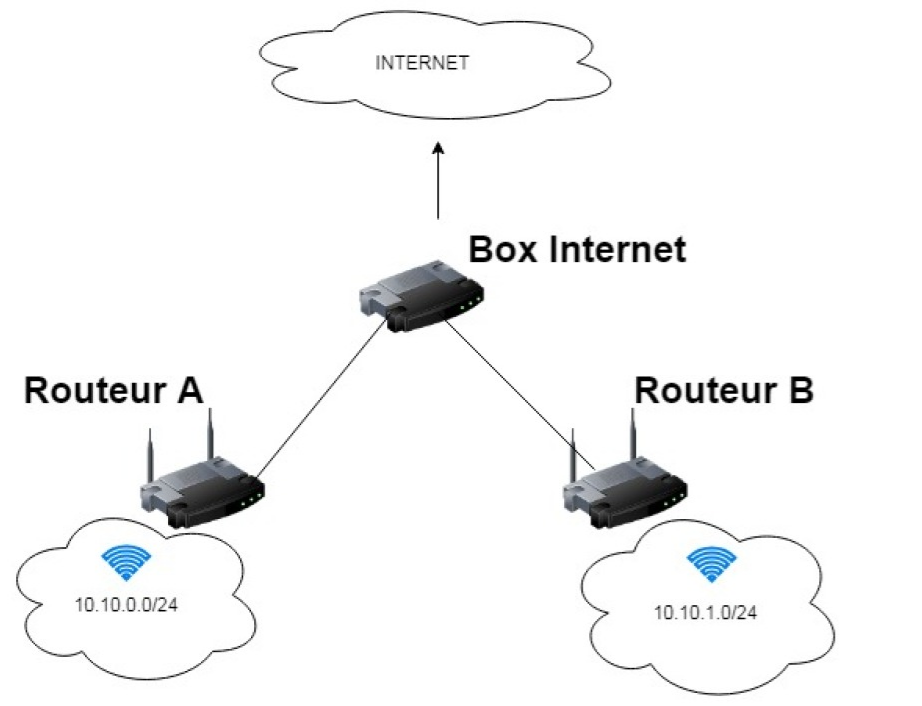 |
| Топология домашней Интернет-сети с двумя роутерами |
Более интересным и практичным решением, которое можно назвать «Защищенная домашняя сеть RPi 3 - HomeFW» - является использование в ее конфигурации микрокомпьютера Raspberry Pi 3. В этом случае мини-компьютер превращается в точку доступа Wi-Fi со встроенным брандмауэром, подключенную к Ethernet-роутеру. Этот метод несколько сложнее реализуем. Его преимуществом выступит
- низкая стоимость и
- более широкие возможности.
Дэвида Джейкоби, специалист по безопасности «Лаборатории Касперского» в ходе пресс-конференции еще в 2017 году демонстрировал уязвимости сетей и подключенных к ним устройств. Особое внимание эксперт уделил безопасности подключенных к домашней сети устройств, которые часто имеют множество уязвимостей.
«Производители в настоящее время не готовы вкладывать средства в безопасность своих устройств в сети, потому что это стоит слишком дорого. Поэтому мы должны действовать по-другому, чтобы ограничить риск», - считает Джейкоби.
 |
| Сравнительная топология домашней сети с использованием метода сегментирования посредством встраивания мини-компьютера Raspberry Pi 3 и без него |
В такой конфигурации пользователи, подключенные к «Защищенная домашняя сеть RPi 3 - HomeFW», могут использовать услуги Интернета, но брандмауэр не позволит им выполнять поиск в сети, поставляемой через Интернет-роутер. И наоборот, оборудование, подключенное к Интернет-роутеру, не сможет получить доступ к сегменту сети, обеспечиваемой «Защищенной домашней сеть RPi 3 - HomeFW». Сегментацию домашней сети в таком случае можно признать практически идеальной.
Руководство по установке и настройке оборудования
Собрать такое устройство не очень сложно. Работа с командной строкой оболочек также довольно проста.
Комплектующие, которые необходимо приобрести:
- Экран с разъемом HDMI,
- клавиатура и мышь с разъемами USB,
- кабели Ethernet для подключения Raspberry Pi 3 к Интернет-приставке.
1 - Прошивка системы
Загружаем последнюю версию Raspian, операционной системы на базе Linux Debian, специально предназначенную для компьютеров Raspberry Pi. Затем необходимо выполнить саму «прошивку» - то есть установку - этой системы на карту microSD (объемом минимально 16 ГБ). Оптимальный способ - использовать программу Etcher, которая очень проста в использовании. Процедура аналогична той, которая выполняется при создании загрузочной флешки.
 |
| Интерфейс программы Etcher |
2 - Инициализация системы
При первом запуске система попросит выбрать язык и cменить пароль. Пароль должен быть сложным.
 |
| Окно смены пароля |
Подключаться к сети Wi-Fi не нужно. Мини-компьютер Raspberry Pi уже подключен к сети Интернет через кабель Ethernet. Модуль Wi-Fi будет использоваться для создания точки доступа. Так что на следующем этапе нужно нажать кнопку «Пропустить».
 |
| Пропуск подключения к сети Wi-Fi |
Затем система предложит выполнить поиск обновлений, которые нужно принять, нажав кнопку «Далее». Процедура может занять некоторое время.
 |
| Загрузка обновлений |
3 - Загрузка кода
Необходимо открыть окно командной строки, щелкнув четвертый значок слева сверху. Значок представляет собой окно со знаком больше и подчеркиванием.
Вписываем следующую команду и подтверждаем ввод:
> git clone https://github.com/gkallenborn/HomeFW HomeFW
Затем компьютер загрузит сценарий брандмауэра (firewall.sh), файл конфигурации (configurations.txt) и информационные файлы в новую папку с именем HomeFW.
 |
| Загрузка кода |
4 - Установка программного обеспечения
Далее необходимо загрузить и установить программное обеспечение, которое и позволит создать безопасную точку доступа. В данном случае этим ПО будут:
- hostapd (программное обеспечение точки доступа Wi-Fi),
- isc-dhscp-server (программное обеспечение, которое будет назначать IP-адреса подключенным терминалам),
- dnsmasq (программное обеспечение службы DNS) и
- iptables (программное обеспечение межсетевого экрана).
Для этого необходимо выполнить приведенную ниже команду и во время установки проверять ее ввод каждый раз, когда она запрашивается. Команда apt-get install инициирует установку программного обеспечения, указанного после нее. Префикс sudo означает, что команда будет запускаться с правами администратора.
> sudo apt-get install hostapd isc-dhcp-server dnsmasq iptables
 |
| Установка ПО |
5 - Настройка точки доступа
Для правильной работы точки доступа необходимо изменить ряд файлов конфигурации. Это самая важная часть установки. Удобнее работать с одновременно открытыми двумя окнами команд. В первом отображается содержимое файла configuration.txt с помощью следующей команды:
> more ./HomeFW/configurations.txt
Во втором окне открыт текстовый редактор «nano» для изменения файлов путем копирования и вставки строк из одного окна в другое. Будьте внимательны, следуя инструкциям в файле configurations.txt. Приведем команды, которые необходимо выполнять последовательно:
> sudo nano /etc/hostapd/hostapd.conf
> sudo nano /etc/dhcp/dhcpd.conf
> sudo nano /etc/sysctl.conf
> sudo nano /etc/default/isc-dhcp-server
> sudo nano /etc/default/dnsmasq
> sudo nano /etc/network/interfaces
 |
| Настройка точки доступа |
Затем перезапустите Raspberry Pi 3, выполнив следующую команду:
> reboot
6 - Активация брандмауэра
При сканировании близлежащих сетей Wi-Fi появится точка доступа с названием «IOT». Но эта новая сеть не позволяет получить доступ к Интернету, и она не обязательно является защищенной по сравнению с сетью роутера. Чтобы обеспечить ее защитой, нужно запустить скрипт firewall.sh. Выполните следующие команды:
> cd HomeFW
> chmod +x firewall.sh
> sudo ./firewall.sh
Первая команда позволяет перейти в каталог HomeFW, вторая делает скрипт исполняемым, а третья выполняет его.
Вот и все. Теперь вы стали владельцем сети Wi-Fi под названием «IOT», полностью изолированная от остальной сети.
Рекомендации по эксплуатации конфигурации
Если по той или иной причине Raspberry Pi 3 отключится, то придется перезапустить и его и перезапустить скрипт firewall.sh, как указано в шаге 6.
Чтобы избежать необходимости каждый раз подключать экран, клавиатуру и мышь, удобнее подключаться удаленно к Raspberry Pi 3 из локальной сети через службу SSH (Secure Shell).
Чтобы служба SSH запускалась автоматически при включении Raspberry Pi 3, вы должны:
создать пустой файл «ssh» в корне карты microSD. Для этого вставьте карту microSD в компьютер.
В macOS запустите окно Spotlight (клавиши Command + пробел), напишите «терминал», затем запустите одноименное приложение.
Затем пропишите следующие команды:
> cd / Volumes / <microSD-card-reader-name
>> touch ssh
В Windows введите «cmd» в поле поиска Cortana, затем запустите одноименное приложение (или нажмите win + R). Затем пропишите в командной строке следующие команды:
> <microSD-card-reader-letter>:
> type NUL > ssh
При следующем перезапуске системы Raspbian служба SSH будет автоматически запущена и доступна из домашней сети.
Завершено знакомство с интересным методом сегментирования домашней сети в целях повышения ее безопасности. В проекте использован широкодоступный, многофункциональный и достаточно мощный микрокомпьютер Raspberry Pi 3. Предложенная топология позволяет отделить критически важные части домашней сети и защитить их дополнительно. Предусмотрено удаленное управление конфигурацией, которое позволяет быстро восстановить работоспособность защищенного сегмента в случае сбоя. Предложенная методология позволяет усовершенствовать навыки наладки и конфигурирования сетевого программного обеспечения, сборки аппаратной части микрокомпьютера. Реализация проекта позволит в домашних условиях повысить квалификацию действующим специалистам и овладеть новыми навыками тем, кто профессией сетевого администратора только овладевает. И это помимо того, что вы получите более защищенную и управляемую домашнюю сеть. Ждем ваших вопросов и предложений!

***
ENG
***
How to keep your home network secure with a Raspberry Pi 3 mini computer
Computer security with the expansion of the Internet functionality in ensuring comfortable living conditions is becoming an important area of knowledge for every user of network devices. The environment of a person's life is becoming more and more computerized: the management of housing, cars, security systems, both personal and property, navigation systems, life support systems are interconnected with the World Wide Web and local data networks. And therefore, knowledge of the basics of information security is an important competence of a modern person. The blog "In the world of IT: in the world of IT" offers the reader a variety of materials on the problem of cybersecurity. For example, a large publication is devoted to the attack on a critical facility for the life support of the United States - the gas pipeline of the Colonial Pipeline Company. This article is about a fun way to make your home network more secure. In addition, those who decide to implement this project in their home will learn a lot about using and configuring microcomputers such as the Raspberry Pi. Happy reading!
 |
| Raspberry Pi 3 |
The main recommendation to prevent hackers from penetrating the settings and information data is the need to divide the home network into several parts, isolated from each other. The best way to solve the problem is to use a miniature Raspberry Pi computer.
In most homes connected to the Internet, the home network topology is usually typical: all equipment is connected directly to the operator's Internet terminal and uses a single local network. With the proliferation of home terminals, a wide variety of equipment is connected to this single line. From the same network, there is a stationary computer on which online purchases are made, a NAS drive that stores all family photos, laptops of children who begin to hang in peer-to-peer networks with low signal quality and are completely vulnerable; other electronic networking devices.
 |
| How to keep your home network secure with a Raspberry Pi 3 mini computer |
Segmentation of the home network to ensure its security
Cybersecurity experts do not recommend combining equipment in this way within the same network. It is quite easy for a hacker who succeeds in infecting one of the connected objects or one of the laptops to gain access to other equipment. This is why security experts recommend segmenting your network as much as possible. In one part, in this case, it is necessary to place critical equipment, which must be absolutely protected (parent computers, NAS), and in the other, we can place high-risk terminals, which include gaming laptops or other connected objects.
 |
| How to keep your home network secure with a Raspberry Pi 3 mini computer |
 |
| Home Internet topology with two routers |
A more interesting and practical solution, which can be called “Protected Home Network RPi 3 - HomeFW”, is to use a Raspberry Pi 3 microcomputer in its configuration. In this case, the mini-computer turns into a Wi-Fi access point with a built-in firewall, connected to an Ethernet router. This method is somewhat more difficult to implement. Its advantage will be
- low cost and
- more opportunities.
David Jacoby, a security specialist at Kaspersky Lab, during a press conference back in 2017, demonstrated the vulnerabilities of networks and devices connected to them. The expert paid special attention to the security of devices connected to the home network, which often have many vulnerabilities.
“Manufacturers are currently not ready to invest in the security of their devices on the network, because it is too expensive. Therefore, we must act differently to limit the risk, ”says Jacoby.
 |
| Comparative home network topology using the segmentation method by embedding a Raspberry Pi 3 mini computer and without it |
In this configuration, users connected to RPi 3 Secure Home Network - HomeFW can use Internet services, but the firewall will prevent them from searching the network supplied through an Internet router. Conversely, equipment connected to the Internet router will not be able to access the network segment provided by the RPi 3 Protected Home Network - HomeFW. In this case, the segmentation of the home network can be considered almost ideal.
Hardware Installation and Configuration Guide
Assembling such a device is not very difficult. Working with the shell command line is also pretty straightforward.
Components to be purchased:
- Display with HDMI connector,
- USB keyboard and mouse
- Ethernet cables to connect the Raspberry Pi 3 to the Internet box.
1 - System firmware
Download the latest version of Raspian, a Linux Debian based operating system specifically designed for Raspberry Pi computers. Then you need to perform the "firmware" itself - that is, installation - of this system on a microSD card (at least 16 GB). The best way is to use Etcher, which is very easy to use. The procedure is the same as when creating a bootable USB flash drive.
 |
| Etcher program interface |
2 - System initialization
At the first start, the system will ask you to select the language and change the password. The password must be complex.
 |
| Password change window |
You don't need to connect to a Wi-Fi network. The Raspberry Pi is already connected to the Internet via an Ethernet cable. The Wi-Fi module will be used to create an access point. So the next step is to click the "Skip" button.
 |
| Skipping Wi-Fi Connection |
The system will then prompt you to search for updates to be accepted by clicking the Next button. The procedure may take some time.
 |
| Downloading updates |
3 - Loading the code
You need to open a command prompt window by clicking the fourth icon from the top left. The icon is a box with a greater than sign and an underscore.
We enter the following command and confirm the input:
> git clone https://github.com/gkallenborn/HomeFW HomeFW
The computer will then download the firewall script (firewall.sh), the configuration file (configurations.txt), and information files to a new folder named HomeFW.
 |
| Loading the code |
4 - Installing the software
Next, you need to download and install the software, which will allow you to create a secure access point. In this case, these software will be:
- hostapd (wifi hotspot software),
- isc-dhscp-server (software that will assign IP addresses to connected terminals),
- dnsmasq (DNS service software) and
- iptables (firewall software).
- To do this, you need to run the command below and during installation check its input every time it is requested. The apt-get install command initiates the installation of the software specified after it. The sudo prefix means that the command will run with administrator privileges.
> sudo apt-get install hostapd isc-dhcp-server dnsmasq iptables
 |
| Installing the software |
5 - Configuring the access point
A number of configuration files need to be modified for the access point to function properly. This is the most important part of the installation. It is more convenient to work with two command windows open at the same time. The first displays the contents of the configuration.txt file using the following command:
> more ./HomeFW/configurations.txt
In the second window the text editor "nano" is opened to modify files by copying and pasting lines from one window to another. Be careful following the instructions in the configurations.txt file. Here are the commands that must be executed sequentially:
> sudo nano /etc/hostapd/hostapd.conf
> sudo nano /etc/dhcp/dhcpd.conf
> sudo nano /etc/sysctl.conf
> sudo nano / etc / default / isc-dhcp-server
> sudo nano / etc / default / dnsmasq
> sudo nano / etc / network / interfaces
 |
| Access point setting |
> cd HomeFW> chmod + x firewall.sh> sudo ./firewall.sh
Configuration Operation Guidelines
create an empty "ssh" file at the root of the microSD card. To do this, insert the microSD card into your computer.On macOS, launch the Spotlight window (Command + Spacebar), write "terminal", then launch the application of the same name.Then write the following commands:> cd / Volumes / <microSD-card-reader-name>> touch ssh
> <microSD-card-reader-letter>:> type NUL> ssh


#techhistory, #qwerty, #wish, #usa #computer, #technology, #tech, #pc, #photooftheday, #overview #software, #office #computerscience #hardware, #вмиреит, #intheworldofit, #technoblog, #Technews #tech #вмиреит #technology #techlover, #intheworldofit #engineering #technoblog #компьютерныекурсы⠀#top, #техноблог #future #факты #интересно #facts, #события #интересныефакты #обучение #2021 #факт
#новости #intresting #fact #didyouknow #science #кузбасс #сибирь #russian, #nvkz #бесплатныеобъявлениякомпьютернойтематики, #новокузнецк #daily #dailyfact
Комментарии
Отправить комментарий